|
Working
With Paper in Modeling
Materials
needed:
- Facial" tissue (e.g.,
Kleenex)
- Water
- White Glue
- Soft, wide brushes
- Sharp X-Acto type knife
- Sharp scissors
- Typing paper
- Microscale Decal Saver
- Computer with printer
- Scanner
- Internet access
- Reference material
There are two
major areas I use paper product in building models. The
first, and better known, is moistened tissue paper
doubling as cloth. This can be used to create torn seat
covers, tarps, convertible tops, and mantlet covers for
turreted vehicles.
To do this, get a
small container of water and white glue (Elmer’s). Cut a
swatch of tissue larger than you expect to need. Mix the
water and glue in a 50/50 blend. Apply a coat to the
surface to be covered and apply the tissue. You may
allow it to overlap. At this point you will want to give
the fabric the folds seen in the prototype. Now,
carefully apply more of the glue mixture. If the tissue
tears, you can either start over or tear a small patch
of tissue and apply it to the tear. When you’re
satisfied with the look, set this aside and let it dry.
When this is fully dried, the fabric will retain its
texture but have a reasonably hard surface which will
accept all types of paint. Trim away the excess with a
new #11 blade. Paint and weather according to your
references.
The next area I
have found for using paper in modeling couples with the
computer. You can make numerous types of patches,
patterned cloth, and display accents from your color
printer.
Displays:
Searching the
Internet, particularly Ebay, for movie posters can
provide nice accents on your base. Simply do a search
for the movie you want. You will almost certainly fond a
poster or video box top you like. When you find this,
right click on the picture and a menu box will appear.
Choose the "save picture as" option and save it where
you keep documents or other pictures. It’s a good idea
to give it a title you can easily recognize and
remember. You should also choose the "bmp" format.
Now you’ll want
to open a new document in your word processor program.
Chose your option to insert a picture from file. Go to
the directory where you’ve saved your picture from the
Internet and insert it in the word document. Click on it
to highlight it and grab a corner marker and resize it
to fit your needs. Remember, making a picture smaller
will seemingly increase the picture quality while making
it larger will cause some degradation. You may find that
you need to go online to replace the picture. When
you’re satisfied with the quality, save and print the
document.
When the inks
have fully dried, seal the picture with either a sprayed
coat of Dullcoat or a brushed on application on
Microscale Decal Saver/film. This will reduce the
likelihood of the colors running. Carefully cut the
image out and apply it with a thin layer of full
strength white glue. Let this dry and seal this with a
sprayed coat of Dullcoat or your preferred base sealant.
Patches,
badges, fabric
You are working
on a figure or a tank. The markings you want are in a
reference book. You know you’re not going to be able to
paint this. There are no readily available aftermarket
decals available. What do you do?
This process is
similar to above but you will need access to a scanner.
Scan your
material and save it as a "jpg" where you can find it.
You’ll probably need a decent photo-editing program to
get good results here.
Open the file in
your photo program, crop the image as close as possible.
And do a "save as" command with a new name to preserve
your original. Do a test print in a word document as
above. You may need to try several different sizes to
get the effect you need.
Since you’ll be cutting with very small tolerances, make
several copies of your test shot. Let the ink dry
completely and seal it with Decal saver/film. This
maintains high degree of flexibility and smoothes out
without brush strokes. If this looks good, very
carefully cut this out with a fresh #11 blade. Again,
put a drop of thinned white glue where you want this.
Place the image on the model. The paper will absorb some
of the water and become quite flexible. Carefully press
it into the folds. The most difficult part in this is
following a bend such as at the elbow or knee.
It’s quite likely
your image will not be what you like when you print it
so you’ll need to clean it up. Go back to your photo
editor and reopen the saved second copy (not the
original). Choose your editing tool and enlarge your
image as much as you can. You can tighten up edges where
colors have bled even one pixel at a time. When you have
a section you like, save it. Save often. Save even more
often. If in doubt, save. When you are happy with the
product, save it again and drop it into a word document
and again print out a test shot in several sizes and
proceed as above.
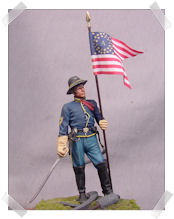
Flags
Okay, not many of
us are as talented as the best of our figure guys or
those Russians mass producing painted kits. But you want
a particular flag in your display. Again, get your
references, online or from a book. A flat flag image is
better than a photo with folds present for this
application. Proceed entirely as above in getting your
image into your computer. You will need a photo editor
for this, however. Open your flag image, crop out the
excess surrounding it and save it under a new name. If
the flag has a canton (the field where the stars are),
you will need a mirror image of the flag. Flip the
image, crop it and save it. Copy and paste this image
into the original image and place them end to end along
the edge closest to the flagpole and save this image.
Go back to your word document and insert this and resize
it according to the scale you’re using. When the inks
are dry, seal let this dry then cut the whole image out.
Fold sharply along the center. Apply slightly thinned
white glue to the inside surfaces of the image. Consider
how your flag is attached to the pole. If it’s tied or
on a lanyard, fold it over now. If the flag wraps around
the pole, you’ll need to insert the pole at this time,
because you won’t be able to insert it once the flag is
glued together. Using a straight edge, carefully fold
both sides together. The paper should have been softened
at this point allowing you to add smooth folds and
furls. You may need to work with this to keep the folds
the way you want them. As the glue begins to set and the
flag no longer wants to straighten out, set it aside to
dry. When this has fully cored, use a small awl to make
the requisite number of holes and attach the flag to the
pole or lanyard.
|